Vacuum casting is not only about pouring resin into a mold. It is a delicate art that needs precision and a little foresight, and creativity to get flawless parts. Have you ever wondered why some prototypes have a buttery smooth finish while others are filled with micro-defects? That is all in the nuances of your vacuum casting design guide.
That’s because getting the details right, from material behavior to wall thickness to undercuts to venting, will make a big difference for you, whether you are an experienced engineer or a first-time designer, between a good-enough part and one that feels just right, like it rolled off a production line. This guide strips away the jargon to walk you through practical tips, common pitfalls, and little-known tricks that’ll help you master the process.
Introduction to Vacuum Casting:
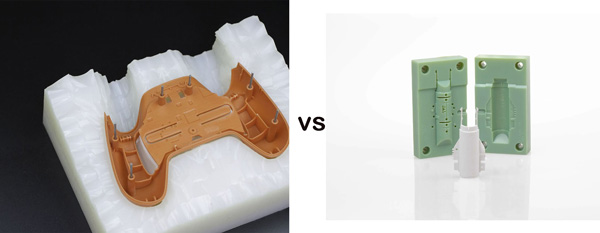
Vacuum casting is not just a catchy buzzword for manufacturing; it’s a process in which liquid material (such as polyurethane resin) goes into a silicone mold under vacuum pressure to get rid of air bubbles and have an incredibly detailed reproduction. It’s somewhere right between 3D printing and mass production, so it’s perfect for those projects where you need both precision and flexibility.
Where Does it Shine?
- Prototypes: Want your CAD design as a physical part in time for the test tomorrow? Vacuum casting gets you functional prototypes within days, so you can test everything from ergonomics to aesthetics instead of waiting for expensive tooling production.
- Low-volume production: Making duplicates of around 10-50 parts? Skip the expense of injection molding. This method is a lifesaver for startups or niche products where overcommitting to inventory feels risky.
- High-detail parts: From intricate medical device components to textured consumer goods, vacuum casting captures fine features (think logos, textures, or thin walls) that other methods might blur.
Why Choose It Over Alternatives?
- High precision: Silicone molds replicate even 0.1mm details, making it a go-to for industries like aerospace or automotive, where tolerances are non-negotiable.
- Cost-effectiveness: No steel molds or massive minimum orders. Perfect for testing market appetite without burning cash.
- Wide material selection: Mimic ABS, rubber-like silicones, or even transparent plastics; there’s a resin for nearly every functional or aesthetic need.
Here’s the kicker: a solid “vacuum casting design guide” is your secret weapon. Small tweaks, like adding draft angles or optimizing wall thickness, can mean fewer rejects and faster turnarounds.
How Vacuum Casting Works:
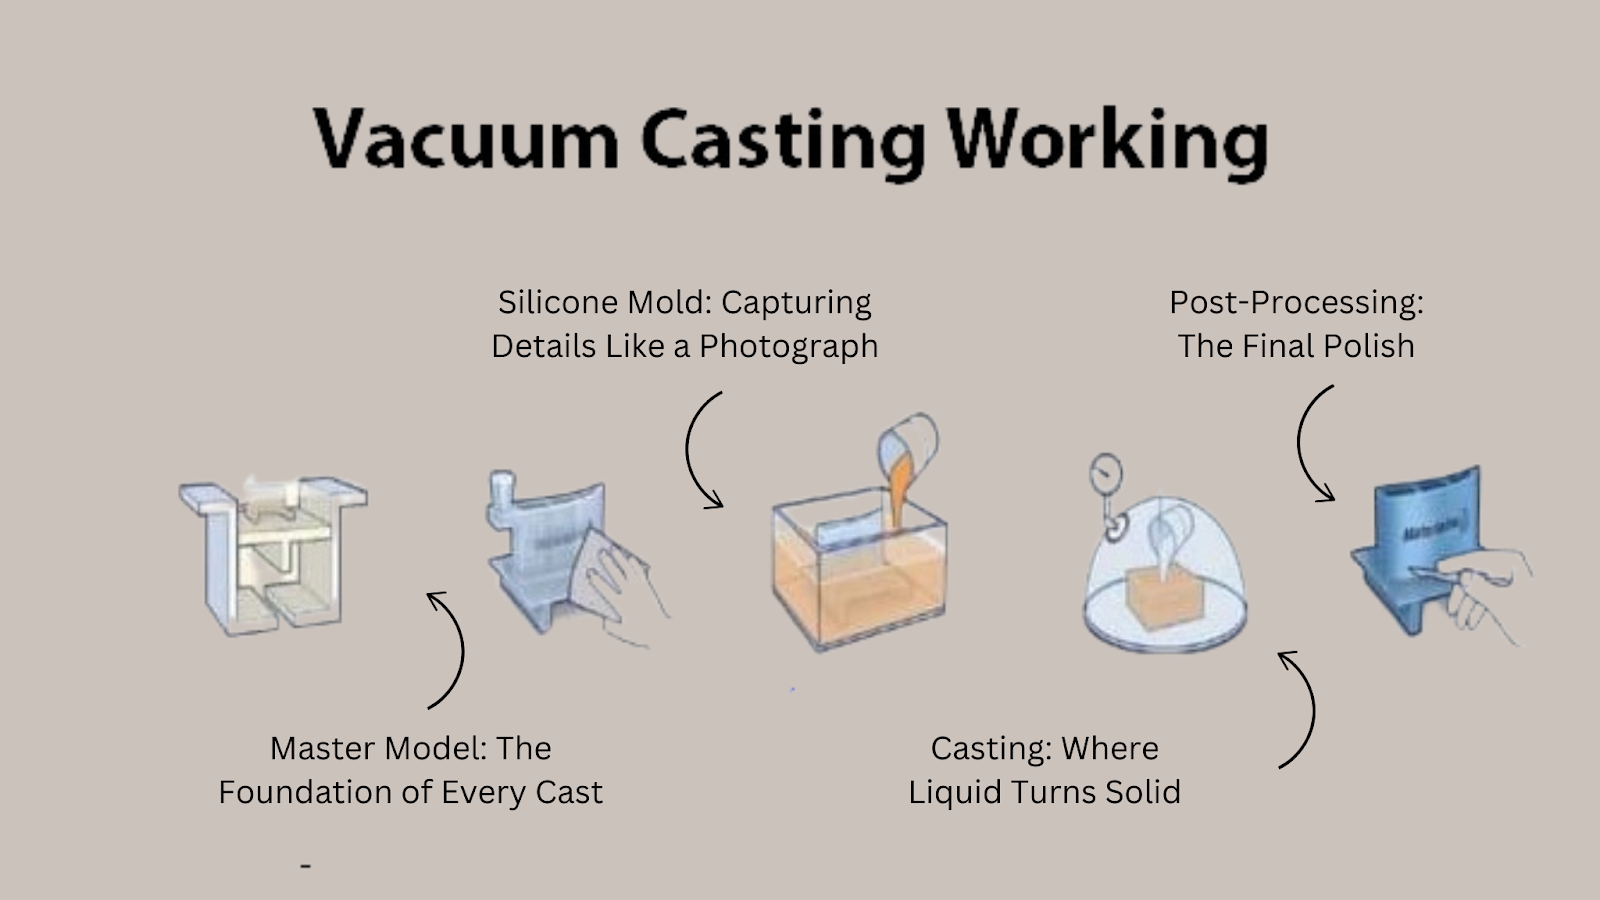
Let’s strip this down to the basics. Vacuum casting isn’t rocket science, but it does require a methodical approach. Picture it as a three-act play: creating a flawless prototype, molding it in silicone, and casting parts with surgical precision. Here’s the unvarnished breakdown:
1. Master Model: The Foundation of Every Cast
It all starts with a master pattern, your part’s identical twin, typically 3D-printed or CNC-machined. This model isn’t just a rough draft; it’s the gold standard. Every nick, scratch, or uneven surface on this prototype will be replicated in every cast, which is why experts treat it like a priceless artifact. Sanding, polishing, and fine-tuning the master’s geometry (think draft angles and wall thickness) are non-negotiable.
2. Silicone Mold:
Once the master is ready, it’s suspended in a frame, and liquid silicone is poured around it. But here’s the critical step: the entire setup is placed in a vacuum chamber. This isn’t just for drama; the vacuum violently yanks out air bubbles trapped in the silicone, ensuring the mold grips every contour, undercut, and texture of the master.
After curing (usually overnight), the mold is carefully sliced open to remove the master. What’s left is a flexible, reusable silicone mold with a cavity that’s a pixel-perfect replica of your design.
Silicone molds aren’t forever. They degrade after 20-30 uses, so this method thrives in low-volume scenarios.
3. Casting: Where Liquid Turns Solid (Gracefully)
Liquid polyurethane resin, rigid, rubber-like, or even transparent, is poured into the mold. But the vacuum isn’t done yet. The filled mold goes back into the chamber, where suction pulls out residual air bubbles and forces resin into every microscopic detail (think fine engravings or hair-thin walls).
The resin cures at room temperature, avoiding the warping risks of high-heat methods. After a few hours, the mold is peeled open, revealing a part that’s often indistinguishable from injection-molded counterparts.
4. Post-Processing: The Final Polish
Most parts pop out ready for use, but some need a little TLC: sanding to remove parting lines, painting for color matching, or assembly if multi-material components are involved.
Why This Works for Real-World Projects
- Speed: Go from CAD model to functional part in days, not weeks.
- Flexibility: Swap resins to test different materials (ABS-like, rubber-like) without retooling.
- Cost: Skip expensive steel molds, which are ideal for startups or niche products.
But here’s the catch: the process demands thoughtful design. Success hinges on nailing the design upfront, studying material behavior, anticipating mold release angles, and respecting the limits of silicone.
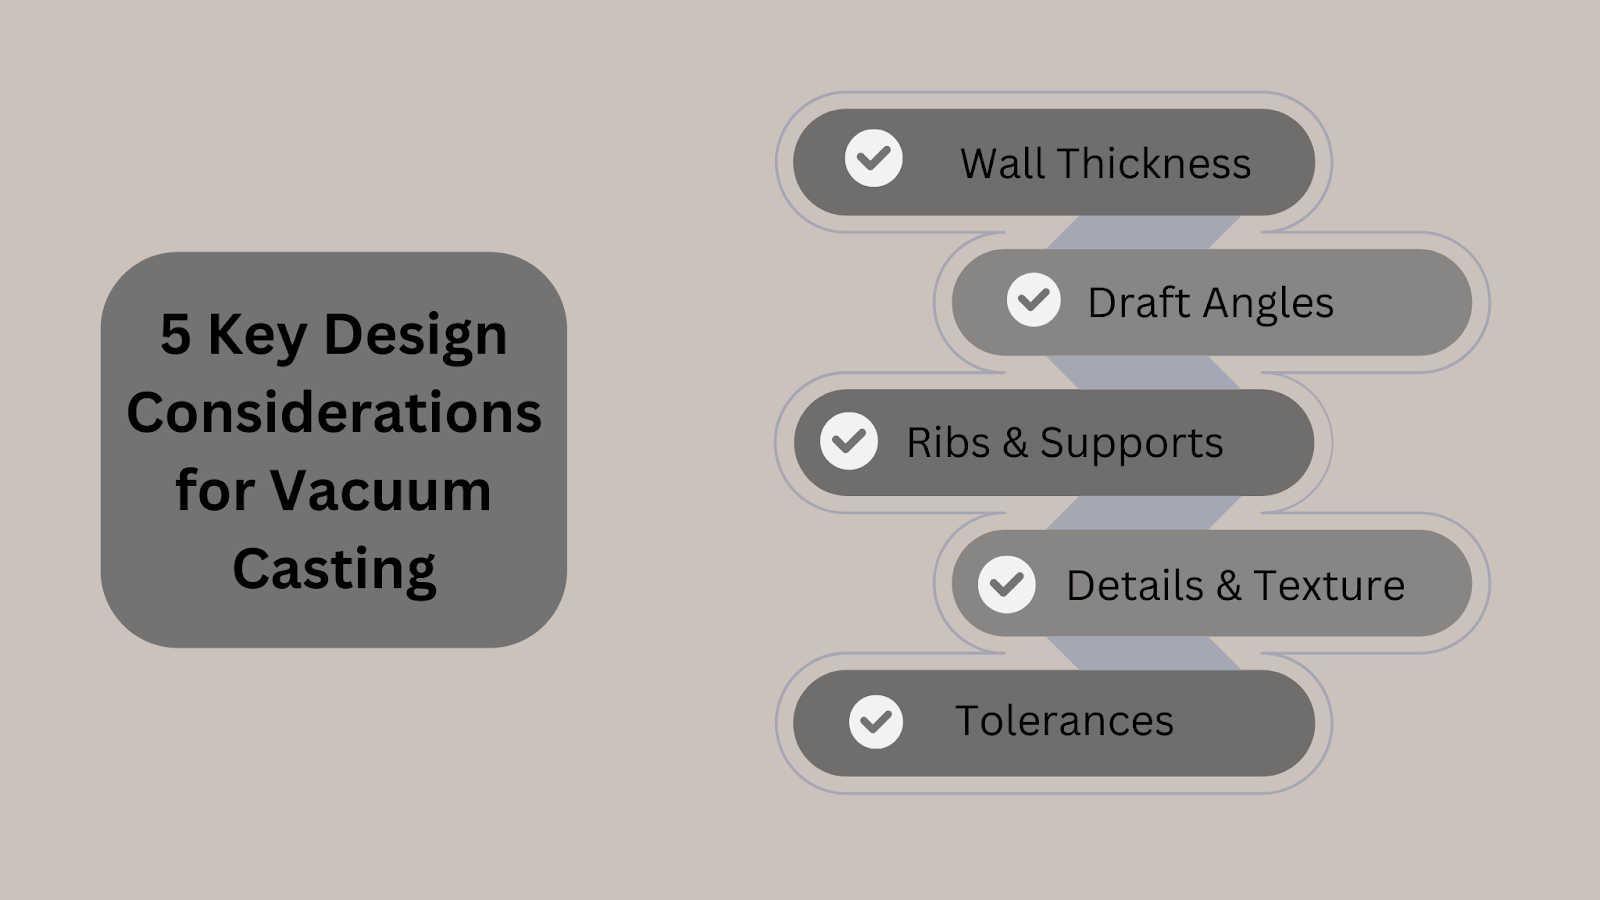
Key Design Considerations for Vacuum Casting:
Vacuum casting isn’t a “set it and forget it” process. It’s a dialogue between your design and the realities of physics, materials, and mold behavior. Skip this conversation, and you’ll wrestle with stuck parts, warped geometries, or surfaces that look like they’ve been through a sandstorm.
1. Wall Thickness: The Goldilocks Zone
Too thin, and your part crumples like paper. Too thick, and it warps or traps air bubbles. Aim for 1.5 mm to 4 mm, the sweet spot where most resins behave.
- Below 1 mm? Risky. Thin walls may not fill properly, leading to incomplete parts.
- Above 6 mm? Trouble. Thick sections cool unevenly, causing sink marks or distortion.
2. Draft Angles: Your Mold’s Exit Strategy
Silicone molds are flexible, but they’re not psychic. Without a slight taper (a 1°–2° draft angle), your part will cling to the mold like gum on a shoe.
- Vertical walls? Add at least 1° per side; imagine LEGO bricks; their subtle slope isn’t just for stacking.
- Textured surfaces? Bump it to 2°–3°. Rough textures grip silicone harder, demanding extra clearance.
Skip the draft, and you’ll either tear the mold or spend hours prying parts out with tweezers.
3. Ribs & Supports: Invisible Backbone
Ribs aren’t just for strength; they’re damage control for thin walls. But tread lightly:
- Height: Keep ribs ≤ 3x the adjacent wall thickness. Taller ribs act as heat sinks, warping the part.
- Thickness: Aim for 50–60% of the wall they’re supporting. Thick ribs create sink marks; thin ones snap.
4. Details & Texture:
Vacuum casting can replicate details down to 0.1 mm; think fine engravings or leather-like textures. But there’s a catch:
- Undercuts: Avoid them unless you’re using a multi-part mold. Silicone stretches, but not infinitely.
- Surface finishes: Matte textures hide fingerprints better than glossy ones, but they also trap air. Discuss finish requirements with your manufacturer before finalizing the design.
5. Tolerances: Know the Playbook
Expect ±0.2 mm per 25 mm for most dimensions. Critical features (like mating surfaces) can hit ±0.1 mm with tight process control. But remember:
- Material matters: Rigid resins hold tighter tolerances than rubber-like ones.
- Geometry impacts accuracy: Tall, slender features are more prone to deviation than chunky ones.
Vacuum casting rewards designers who respect its quirks. It’s not about memorizing rules; it’s about understanding why a 2° draft angle saves molds or how a 0.5mm tweak in wall thickness dodges a week of rework.
Common Mistakes to Avoid in Vacuum Casting Design:

We’ve all been there, spending hours perfecting a CAD model, only to watch the first cast emerge warped, bubbly, or stubbornly stuck in the mold. Vacuum casting forgives little, but learning from others’ blunders can save you time, cash, and a solid dose of frustration.
1. Wall Thickness:
Too thick, and you’re inviting sink marks or internal voids as the resin cools unevenly. Too thin, and the part might flex, crack, or simply fail to fill.
- The Fallout: A 6mm wall might seem robust, but it’ll cool slower than thinner sections, pulling material inward (hello, dimples). Conversely, a 0.8mm “feature” could leave you with half a part.
- Fix It: Stick to the 1.5–4mm Goldilocks range. For transitions (e.g., thick ribs meeting thin walls), taper gradually, like easing into a hot bath, not cannonballing.
2. Shrinkage Rate:
Resins shrink as they cure, anywhere from 0.15% to 0.3%, depending on the material. Ignore this, and your 100mm part becomes 99.7mm.
- The Fallout: A client once designed a snap-fit enclosure that “mysteriously” wouldn’t close.
- Fix It: Multiply critical dimensions by the resin’s shrinkage rate before creating the master. Your manufacturer can provide exact numbers; ask early.
3. Runner Design:
Rogue Runners (channels guiding resin into the mold) aren’t just “pipes”; they’re traffic controllers. Too narrow, and resin fights to fill the mold, trapping air. Too wide, and you waste material.
- Use tapered runners (wider at the inlet, narrowing toward the part) to maintain steady pressure.
- Place runners at the thickest section of the part; this lets resin flow toward thinner areas as it cools.
- Add venting channels in problem areas (e.g., deep pockets) to give trapped air an escape route.
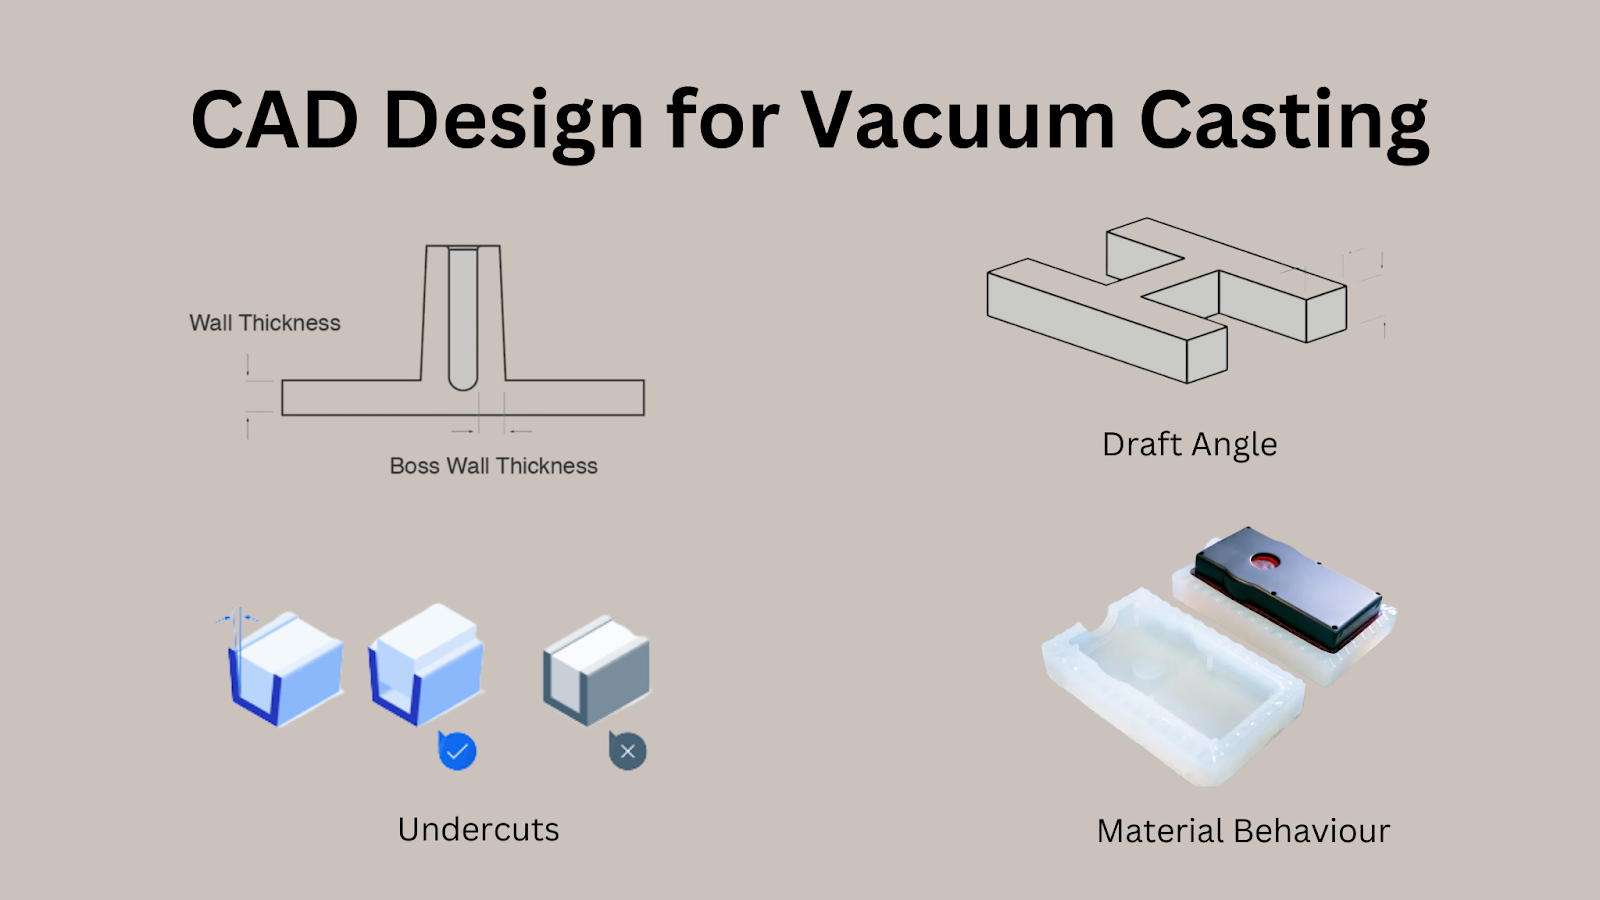
Optimizing Your CAD Design for Vacuum Casting:
Let’s be honest: Even the slickest CAD model can crumble if it’s not built for vacuum casting’s quirks. Think of it like tailoring a suit: measure twice, cut once. Here’s how to tweak your design so it doesn’t just look good on-screen but works flawlessly in silicone and resin:
1. Wall Thickness: Consistency Is King
Aim for 1.5–4 mm walls, but avoid abrupt transitions. If your design has thick and thin sections (like a handle meeting a panel), slope the change gradually. Sharp shifts trap stress, leading to warping or voids.
Pro tip: Run a sectional analysis in your CAD software to spot risky zones.
2. Draft Angles: The Silent Hero
Even a 1° taper on vertical walls can mean the difference between a smooth demolding and a shredded silicone mold. For textured surfaces or deep pockets, bump it to 2°–3°. No one wants to play “mold surgeon” after every cast.
3. Undercuts: Tread Lightly
Silicone molds are stretchy but not infinitely elastic. If your design has undercuts (e.g., snap-fit hooks), consult your manufacturer early. Sometimes, splitting the mold into halves or adding relief slots saves the day.
4. Material Behavior: CAD ≠ Real Life
Resins shrink as they cure, usually by 0.15–0.3%. Scale critical dimensions in your CAD file to compensate. For example, a 100mm part might need a 100.2mm design. Your manufacturer’s material datasheet is your cheat code here.
Why This Matters
Ever had a design that looks flawless on-screen but secretly feels like it’s one sneeze away from derailing your entire timeline? Even the tiniest oversight, a wall thickness that’s almost right or a sneaky undercut, can snowball into delays or mold repairs that’ll make your wallet wince. And let’s be honest, when you’re staring at a part that seems to fight the manufacturing process itself, you don’t just need another pair of eyes. You need a team that lives for untangling these messes.
That’s where Koonze Rapid steps in. We don’t just talk about bridging high-end CAD designs with castable parts; we’ve got the vacuum-casting chops to make it happen. But here’s the real gem: we’ll review your design for free before you commit to anything. Yep, our engineers comb through your files like they’re hunting for buried treasure, flagging potential hiccups (like that pesky draft angle you swore was fine) so you avoid costly do-overs.
Whether it’s a medical part where a micron matters or a prototype that looks like it escaped a sci-fi movie, Koonze’s blend of precision and hustle keeps things moving. No ego, no corporate fluff, just humans helping humans dodge manufacturing headaches.
Conclusion
Vacuum casting isn’t just about replicating parts; it’s about crafting designs that respect the dance between creativity and physics. Nail wall thickness, embrace draft angles, and anticipate material quirks, and you’ll sidestep 90% of headaches.
Remember, even the tiniest tweak, a 0.5° taper or a 0.2mm wall adjustment, can transform a “meh” prototype into a showstopper. Keep this guide handy, but don’t wing it alone. Lean on manufacturers early; their insights often turn “impossible” designs into reality. Ready to bring your CAD files to life? Dive in, iterate fearlessly, and let vacuum casting’s flexibility fuel your next breakthrough.
FAQs
What’s the ideal wall thickness for vacuum casting?
Stick to 1.5–4mm. Thinner walls may not fill properly; thicker areas risk warping. For material-specific guidance, refer to a detailed vacuum casting design guide.
Are draft angles necessary for basic geometries?
Absolutely. Even a minimal 1° angle prevents parts from sticking to molds. A vacuum casting guide explains how to integrate them without compromising aesthetics.
Can undercuts be cast without damaging molds?
Shallow undercuts work, but deep ones risk tearing. Solutions like split molds or strategic relief cuts are outlined in most vacuum casting design guides.